5 Steps to Integrate APIs for Social Data
5 Steps to Integrate APIs for Social Data
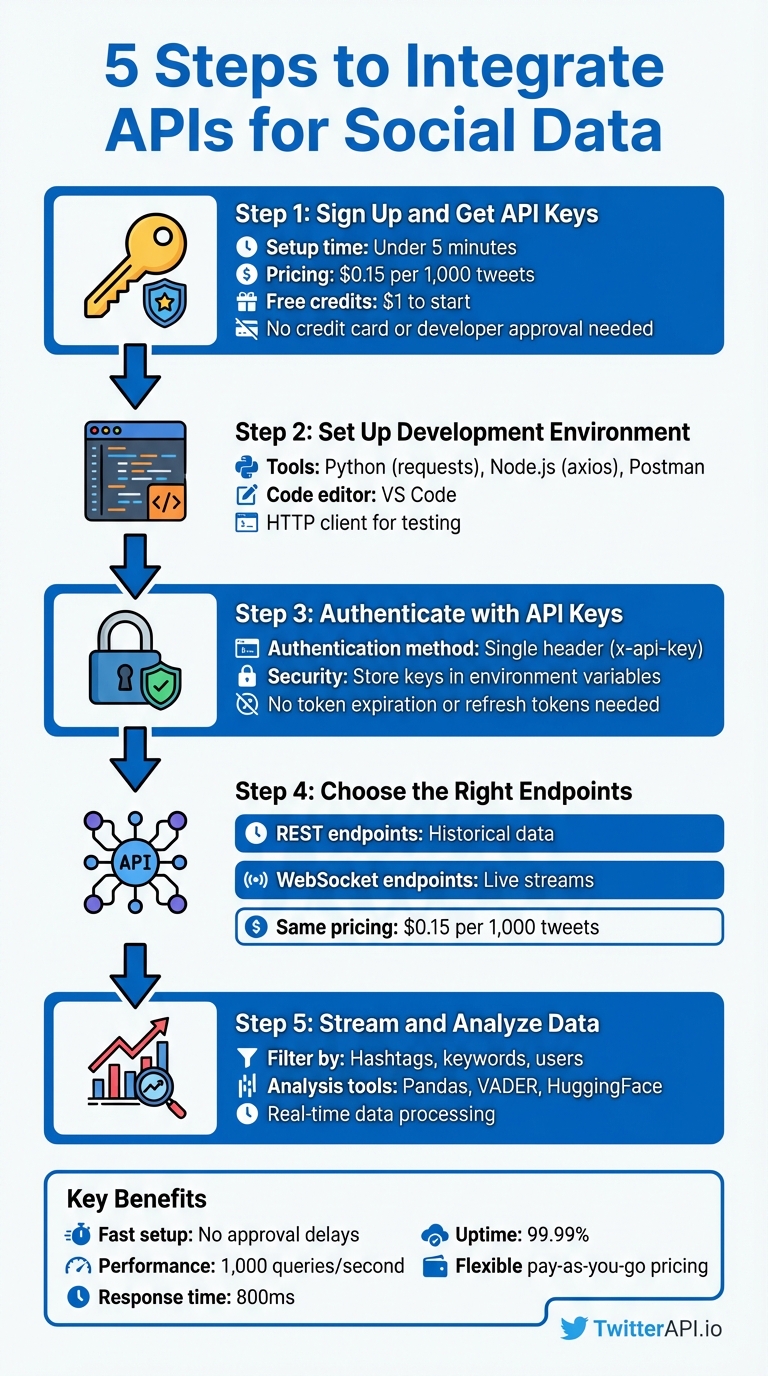
Want to analyze social media data without the hassle? Here's how you can integrate APIs to access real-time Twitter data quickly and efficiently. With platforms like TwitterAPI.io, you can skip lengthy approval processes and complex setups. Here's a quick overview of the process:
- Sign Up and Get API Keys: Create an account on TwitterAPI.io in under 5 minutes, with no credit card or developer approval needed. Pricing is $0.15 per 1,000 tweets, and you start with $1 in free credits.
- Set Up Your Development Environment: Use tools like Python (
requests), Node.js (axios), or Postman for testing API requests. - Authenticate with API Keys: Simplified authentication using a single header:
x-api-key. Secure your keys using environment variables. - Choose the Right Endpoints: Use REST endpoints for historical data or WebSocket endpoints for live streams.
- Stream and Analyze Data: Filter tweets by hashtags, keywords, or users. Parse and analyze data using tools like Pandas or sentiment analysis libraries (e.g., VADER, HuggingFace).
Key Benefits:
- Fast setup with no developer approval delays.
- Flexible, pay-as-you-go pricing.
- High performance: 1,000 queries per second, 800ms response time, 99.99% uptime.
If you’re ready to turn social data into actionable insights, this guide walks you through the entire process step-by-step.
5-Step Process to Integrate Twitter API for Social Data Analysis
Getting Started with Twitter API: A Step-by-Step Guide for Beginners
sbb-itb-9cf686c
What You Need Before Starting
To integrate the API successfully, you'll need the right credentials, tools, and a solid understanding of how API key authentication works. Before diving into the code, make sure you've secured your API credentials, set up your development environment, and grasped the basics of authentication. With TwitterAPI.io, the entire setup process is quick and straightforward - taking less than five minutes. This is a welcome change compared to traditional APIs, which often involve long approval times and complicated OAuth setups.
Get Your API Keys from TwitterAPI.io
Your API key is essentially your gateway to accessing real-time social data. To get started, sign up for an account at twitterapi.io and head over to your dashboard. The API key is displayed right on the homepage, ready for you to copy - no waiting for approvals or extra steps.
TwitterAPI.io operates on a pay-as-you-go model, charging $0.15 per 1,000 tweets. New users also get $1 in free credits. There are no monthly minimums or rigid subscription plans, making this API an excellent option for startups, researchers, and developers who need flexibility.
Set Up Your Development Environment
Before you start coding, ensure your development environment is ready. Depending on your preferred language, you can use tools like:
- Python with libraries such as
requests - Node.js with packages like
axiosornode-fetch - PHP
You'll also need a code editor (e.g., VS Code) and an HTTP client like Postman for testing your requests. These tools will help you parse JSON responses and correctly manage authentication headers. Once your environment is set up, you can focus on implementing API key authentication.
Learn How Authentication Works
API key authentication with TwitterAPI.io is simple and eliminates the hassle of managing tokens. It relies on a single header: x-api-key: YOUR_API_KEY. Unlike token-based systems, there’s no need to worry about token expiration, client secrets, or refresh tokens.
For security, always store your API keys in environment variables instead of hardcoding them. For example:
- In Python, use
export TWITTERAPI_KEY=yourkeyin your terminal or store keys in a.envfile with thepython-dotenvpackage. - In Node.js, you can use similar practices with libraries like
dotenv.
Avoid committing your keys to Git repositories or exposing them in client-side code. To maintain security, periodically rotate your keys through the TwitterAPI.io dashboard.
Step 1: Create Your TwitterAPI.io Account
To get started, visit twitterapi.io and hit the "Sign Up" button. The process is super quick - under five minutes - and you don’t need a credit card to get started. Plus, there’s no waiting around for developer approval or access; your account is ready to go immediately.
All you need to do is sign up with your email, set a password, and verify your account. Once verified, you’ll instantly gain access to your API key. New users also receive $1.00 in free credits to test the service. If you’re a student or researcher, you can email hello@twitterapi.io from your .edu email address to request discounted academic pricing.
The pricing model at TwitterAPI.io is simple and flexible - pay as you go, with no monthly subscriptions required. Use your free credits to estimate how much data you’ll need. For example, if your project involves collecting 100,000 tweets per day, you’d be looking at about $450 per month ($0.15 × 100 × 30). You can easily add more credits as needed, without worrying about contracts or long-term commitments.
Once your account is set up and you’ve got your credits, you’re ready to explore and select the API endpoints that fit your project.
Step 2: Choose the Right API Endpoints
Once your account is active, the next step is selecting the right endpoints to match your data needs. TwitterAPI.io provides two main options: REST endpoints for historical data and WebSocket endpoints for live streams. Understanding how these work will help you integrate the API more effectively.
REST endpoints work via HTTP requests, delivering data only when you ask for it. This is a great choice when you need to analyze past activity, like tracking how a hashtag performed over the last month. By specifying time periods and other parameters, you can retrieve exactly the data you need. This approach is all about on-demand access to historical information.
WebSocket endpoints, on the other hand, are designed for real-time data. They establish a constant connection, automatically pushing new tweets to your application as they’re posted. This eliminates the need for repeated requests, making it perfect for live dashboards, brand monitoring, or staying updated on breaking news. It’s a more efficient way to handle live data since updates arrive instantly.
Your choice depends on your goals: use REST for analyzing past trends and WebSocket for staying on top of live events. Both endpoint types cost $0.15 per 1,000 tweets, so your decision should focus on functionality rather than budget.
Before diving into coding, check out the API documentation at twitterapi.io. It provides detailed information on available endpoints, required parameters, response formats, and rate limits. This ensures you’ll know exactly what fields - like engagement metrics, user details, or tweet content - you can access and how to structure your requests.
Step 3: Authenticate and Connect to the API
TwitterAPI.io keeps things simple with API key authentication - no need to deal with complicated OAuth flows or prolonged approval steps. You can find your unique API key on the Dashboard.
Once you have your API key, include it in the headers for every API request. Here’s how you can do it in Python:
import requests
url = 'https://api.twitterapi.io/twitter/user/followings?userName=KaitoEasyAPI'
headers = {'x-api-key': 'YOUR_API_KEY'}
response = requests.get(url, headers=headers)
print(response.json())
Want to quickly test your setup? Use a cURL command to check if your API key works and if the endpoint responds correctly:
curl --location 'https://api.twitterapi.io/twitter/user/followings?userName=KaitoEasyAPI' --header 'x-api-key: YOUR_API_KEY'
If you’re working in Java, here’s an example using OkHttp:
OkHttpClient client = new OkHttpClient();
Request request = new Request.Builder()
    .url("https://api.twitterapi.io/twitter/user/followings?userName=KaitoEasyAPI")
    .addHeader("x-api-key", "YOUR_API_KEY")
    .build();
Once your connection is established, you’ll have access to TwitterAPI.io’s infrastructure, which can handle over 1,000 queries per second, offers response times of about 800ms, and boasts a 99.99% uptime guarantee. This ensures smooth handling of high-volume data requests. With your authentication in place, you’re ready to dive into streaming and collecting real-time social data in the next step.
Step 4: Stream and Collect Real-Time Social Data
Once authentication is complete, it's time to start gathering live social data. TwitterAPI.io offers three ways to collect real-time data: WebSockets, Webhooks, and REST APIs. Each method serves a different purpose:
- WebSockets: Ideal for live dashboards that need a constant data feed.
- Webhooks: Great for event-driven pushes in serverless setups.
- REST APIs: Best suited for scheduled polling or periodic data retrieval.
To collect data effectively, use precise filtering parameters. For instance, you can track specific hashtags like #AI or #Crypto, search for keywords such as bitcoin, or even filter tweets from specific users with parameters like from:elonmusk. You can combine multiple filters using the OR operator - e.g., crypto OR bitcoin will capture tweets mentioning either term. To reduce irrelevant data and manage costs, focus on specific keyword combinations and apply filters like language or geographic location. This ensures the data aligns with your audience and goals.
Here’s a Python example that demonstrates how to stream tweets about climate change using WebSockets:
import websocket
import json

def on_message(ws, message):
    tweet_data = json.loads(message)
    print(f"New tweet: {tweet_data['text']}")

ws = websocket.WebSocketApp(
    "wss://api.twitterapi.io/stream",
    header={"x-api-key": "YOUR_API_KEY"},
    on_message=on_message
)

# Configure filter to track specific keywords
filter_params = {"track": ["climate change", "global warming"]}
ws.send(json.dumps(filter_params))
ws.run_forever()
You can also assign a rule_tag to each filter rule to categorize incoming data streams. This makes it easier to organize and process data when monitoring multiple topics. For example, labeling streams allows you to route different data types to separate pipelines for analysis.
With TwitterAPI.io's ability to handle over 1,000 queries per second and an average response time of about 800ms, you can monitor high volumes of data without worrying about performance issues. This real-time data stream sets the foundation for efficient analysis, paving the way for visualization and deeper insights in the next step.
Step 5: Analyze and Visualize Your Data
Once your live data stream is set up, the next step is to turn those raw JSON responses into meaningful insights. Start by using Python's json module to parse the data, then load it into a Pandas DataFrame. This makes it easier to filter by language, extract timestamps, and manipulate fields relevant to your analysis. This stage is the culmination of a complete data collection process designed for high-volume research.
For sentiment analysis, VADER is a great choice for handling social media text. It’s fast - processing over 10,000 texts per second - and particularly effective for informal language, emojis, and slang. In fact, it outperforms general-purpose models on social media text by 17–23%. If you need more precise results, especially for nuanced text, try HuggingFace Transformers like BERT or RoBERTa. These models deliver an impressive 91–94% accuracy but require GPU resources and are slower. Another option is TextBlob, which offers quick polarity scoring, though it tends to be less reliable for informal social media content.
"Feeding raw social text into a sentiment classifier is like feeding dirty data into a machine learning model - the output is unreliable regardless of model sophistication." - Boundev Team
Before diving into analysis, clean your data. Remove URLs, @mentions, and special characters while keeping emojis and hashtags intact to maintain context. Tools like spaCy can help with Named Entity Recognition (NER), allowing you to identify brands, products, or locations in your text. To track trends over time, use windowing operators to aggregate sentiment scores in intervals, like every 60 seconds, to spot emerging patterns.
When it’s time to visualize your findings, tools like Matplotlib and Seaborn are excellent for comparing keyword frequencies and sentiment trends. For real-time monitoring, consider deploying your analysis results on interactive dashboards using Streamlit. To ensure fast data aggregation and long-term trend analysis, store your enriched data in time-series databases like TimescaleDB or ClickHouse.
Best Practices and Troubleshooting
Once your data streaming is up and running, managing errors effectively becomes critical to maintaining real-time performance. Keep an eye on rate limits by monitoring the headers x-rate-limit-limit, x-rate-limit-remaining, and x-rate-limit-reset. These headers show how many requests you can still make and when your limit will reset, helping you adjust your request frequency before you hit the limit.
If you run into an HTTP 429 (Too Many Requests) error - one of the most common issues - use exponential backoff to handle retries. Start with a 1-second delay, then double the wait time with each retry (e.g., 2 seconds, 4 seconds, 8 seconds). This approach gives the API time to recover. For applications running across multiple servers, tools like Redis can act as a centralized coordinator to manage global rate limits. By queuing and releasing requests at a steady pace, you can avoid triggering throttling.
Authentication errors, such as HTTP 401 (Unauthorized), often stem from expired Bearer tokens or a desynchronized system clock. Poor token management is a frequent culprit. If you're using OAuth 1.0a, make sure your server clock is synchronized with NTP to keep timestamp discrepancies within 5 minutes. Meanwhile, HTTP 403 (Forbidden) errors usually mean you're missing the necessary OAuth scopes or your access level doesn't match the endpoint's requirements. On the other hand, HTTP 400 (Bad Request) errors - reported by nearly 30% of developers - are often due to malformed JSON or missing required parameters.
For troubleshooting and endpoint-specific guidance, TwitterAPI.io offers 24/7 support and detailed Swagger documentation. The Swagger interface allows you to visualize request and response structures and test different parameters without writing any code. If you face scaling problems or persistent errors, their support team is available around the clock to help refine your setup for handling high-volume data collection.
To optimize performance and stay within rate limits, consider adding caching layers with tools like Redis or Memcached. These can store frequently accessed data, such as user lookups and tweet metadata, reducing redundant API calls. By implementing caching, you ensure fast response times and maintain the efficiency of your real-time data analysis pipeline.
Conclusion
Integrating social data APIs doesn’t have to be complicated or expensive. By following five straightforward steps - setting up your TwitterAPI.io account, selecting the appropriate endpoints, authenticating your connection, streaming live data, and analyzing the results - you can turn real-time tweets into actionable insights with ease.
TwitterAPI.io stands out by sidestepping the usual roadblocks like lengthy developer approvals, restrictive rate limits, and steep enterprise pricing. With lightning-fast 800 ms response times and the ability to handle over 1,000 queries per second, it delivers enterprise-level performance at a fraction of the cost - 96% less, to be exact.
The platform’s pay-as-you-go model ensures flexibility, costing just $0.15 per 1,000 tweets. Plus, new users get $1 in free credits to get started. Whether you’re a startup experimenting with a proof of concept or a business scaling up to process millions of mentions, TwitterAPI.io adjusts to your needs without locking you into rigid monthly contracts.
Sign up today and start unlocking real-time insights. With 24/7 support, detailed Swagger documentation, and a 99.99% uptime guarantee, TwitterAPI.io is ready to help you transform social data into meaningful results.
FAQs
How do I estimate my monthly cost before I start pulling tweets?
To figure out your monthly expenses with TwitterAPI.io, use their pay-as-you-go rate of $0.15 per 1,000 tweets. Simply multiply the number of tweets you plan to retrieve by $0.15, then divide by 1,000. For example, if you intend to collect 100,000 tweets, the cost would be approximately $15. This straightforward calculation allows you to estimate costs based on your expected tweet volume in advance.
When should I use REST vs WebSockets vs Webhooks?
When deciding between these options, consider your app's specific requirements:
- REST APIs work best for periodic or on-demand data retrieval. For example, use them to fetch historical data or user profiles.
- WebSockets are ideal for continuous, low-latency data streams. A good use case would be monitoring live tweets in real time.
- Webhooks shine when instant, event-driven notifications are needed, like getting alerts for new tweets or mentions.
Your choice should depend on factors like the need for real-time updates, acceptable latency, and the complexity of implementation.
What’s the best way to store and analyze streamed tweets at scale?
To handle and analyze a large volume of streamed tweets, you need a dependable data pipeline that can efficiently capture, process, and store the data. Start by using advanced search filters to stream only the tweets that are relevant to your needs in real-time. Once collected, ensure the data is normalized and deduplicated to maintain consistency and avoid redundancy.
For storage, consider scalable options like cloud-based data warehouses or NoSQL databases. These solutions are designed to handle high-throughput data streams while maintaining low latency, making them ideal for real-time analytics.
Tags
Related articles
Ready to get started?
Try TwitterAPI.io for free and access powerful Twitter data APIs.
Get Started Free