Node-Twitter-API-v2 Setup Guide
Node-Twitter-API-v2 Setup Guide
Want to integrate Twitter's API into your Node.js app? The twitter-api-v2 library makes it simple and efficient. Here's what you need to know:
- Lightweight and fast: At just 23 KB, this library is compact and has zero dependencies.
- Supports Twitter API v1.1 and v2: Access legacy and modern features seamlessly.
- Built for TypeScript: Get type definitions for error-free coding.
- Authentication options: Use OAuth 1.0a, OAuth 2.0, or Basic HTTP Authorization.
- Key features: Automatic pagination, chunked media uploads, and reliable stream management.
Quick Steps to Get Started:
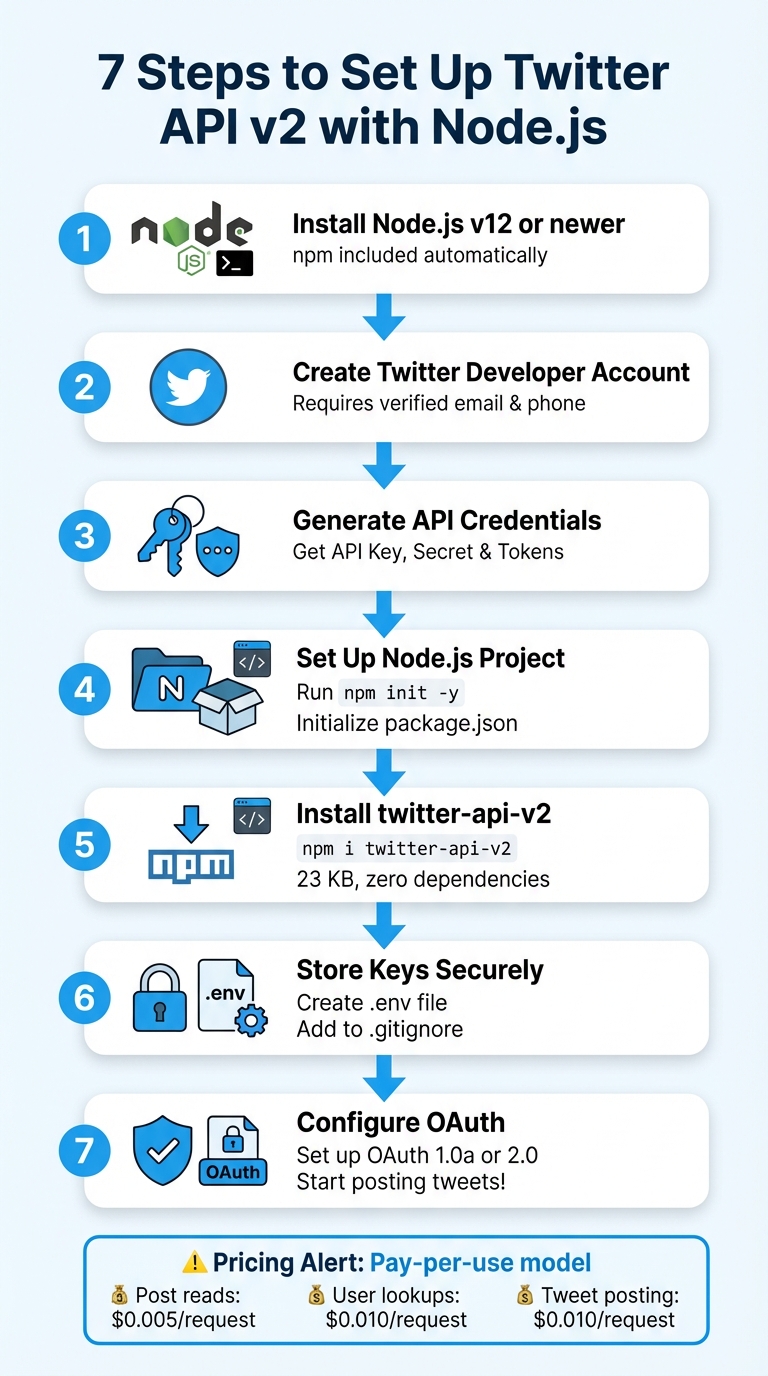
- Install Node.js (v12 or newer) and npm.
- Create a Twitter developer account via the X Developer Portal.
- Generate API credentials (API Key, Secret, and Tokens).
- Set up a Node.js project and install the library with
npm i twitter-api-v2. - Store API keys securely in a
.envfile. - Configure OAuth authentication in your app.
- Start posting tweets, uploading media, or accessing user data.
Important: Twitter's API now operates on a pay-per-use model (or you can explore Twitter API alternatives):
- Post reads: $0.005/request
- User lookups: $0.010/request
- Tweet posting: $0.010/request
Set a monthly spending cap in the X Developer Portal to avoid surprises.
This guide covers everything from setup to writing your first tweet function, including handling media uploads and troubleshooting common errors. Dive in to start building with Twitter's API today!
7 Steps to Set Up Twitter API v2 with Node.js
How to create a Twitter Bot with Node - using the Twitter API
Prerequisites and Setup Requirements
Before diving into integrating the twitter-api-v2 library, make sure you have Node.js, npm, and valid Twitter API credentials ready to go.
Node.js and npm Requirements
First, you'll need to install Node.js and npm. Any stable version of Node.js (v12 or newer) will work just fine. The library is compatible with both CommonJS (using require) and ESM (using import) environments. You can also use Node.js ECMA mode by either using .mjs files or setting "type": "module" in your package.json.
To get started, download Node.js from its official website. The npm package manager will be included automatically during the installation.
Twitter Developer Account and API Keys
To use Twitter's API, you'll need a developer account, which you can set up via the X Developer Portal (formerly hosted at developer.twitter.com, now available at console.x.com). Keep in mind, you'll need a standard X account with a verified email address and phone number to apply for a developer account.
Once you're ready, follow these steps:
- Apply for a developer account through the X Developer Portal.
- Agree to the X Developer Agreement.
- Provide a detailed use case of at least 250 characters.
- Once approved, create a Project and an App to generate your credentials.
These credentials include your API Key & Secret, Bearer Token, and Access Token & Secret. Be sure to save them immediately, as they’re displayed only once.
Important Note on Twitter API tiers and pricing
As of February 2026, the free tier for Twitter's API has been discontinued. Instead, a pay-per-use model is in place with the following costs:
- Post reads: $0.005 per request
- User profile lookups: $0.010 per request
- Posting a tweet: $0.010 per request
To avoid unexpected charges, it's a good idea to set a monthly spending cap in the Billing section of the X Developer Portal. If your app is mission-critical, consider enabling auto-recharge to prevent interruptions.
Once you've got your credentials and environment ready, you're all set to configure your Node.js project and start integrating the twitter-api-v2 library. As you scale, it's also important to manage API rate limits to ensure your application remains stable.
Setting Up the Node.js Project
Start by creating a project folder and setting up the necessary components for your integration.
Initializing a Node.js Project
First, navigate to your project folder and run the command npm init -y. This will generate a default package.json file, which is essential for managing your project's dependencies and metadata.
If you plan to use ES Modules, you’ll need to add "type": "module" in the package.json file. Without this, Node.js will default to CommonJS syntax. Both options work well, but ES Modules might be more suitable for modern JavaScript projects.
Once your project is initialized, it’s time to set up a directory structure that keeps things organized and secure.
Organizing the Project Directory
A well-organized directory structure helps you maintain clarity and ensures that sensitive data is protected. At the root level of your project, you’ll need a few key files:
package.json: Tracks dependencies and project metadata..env: Stores sensitive information like API keys and access tokens securely..gitignore: Prevents sensitive files, such as.env, from being included in version control.index.js: Serves as the main entry point for your application logic.
Keeping credentials and configurations separate from your main business logic is a smart move. This modular setup not only keeps your codebase clean but also makes it easier to reuse components across different scripts or projects.
Here’s a quick overview of the key files and their purposes:
| File/Folder | Purpose |
|---|---|
package.json |
Defines project dependencies and metadata |
.env |
Stores sensitive Twitter API keys and access tokens securely |
twitterClient.js |
Initializes and exports the TwitterApi client instance |
index.js |
Main entry point for bot logic or API calls |
node_modules/ |
Contains installed dependencies like twitter-api-v2 |
Installing the twitter-api-v2 Library
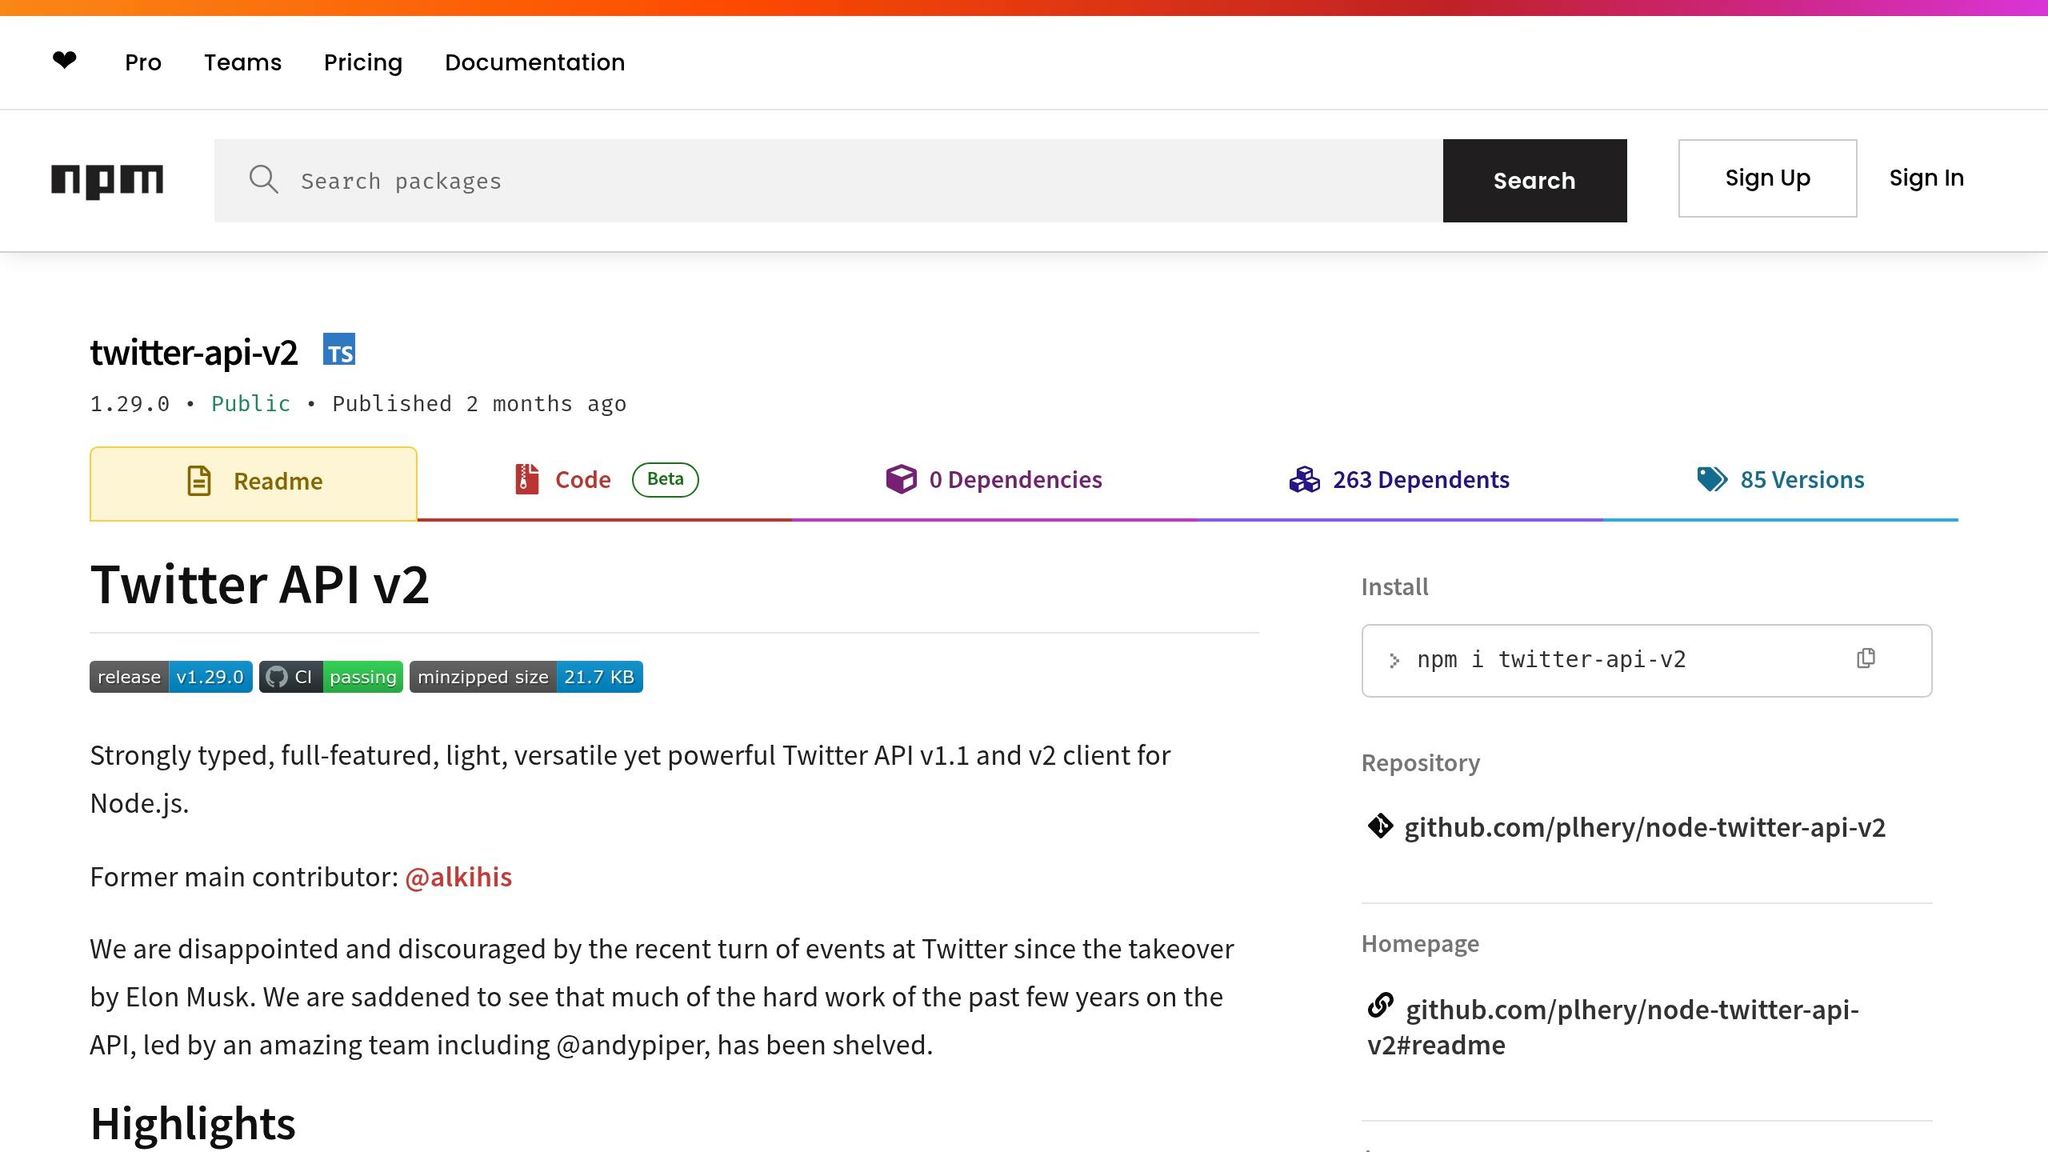
Before diving into your project, the first step is to install the twitter-api-v2 library. This package supports both Twitter API v1.1 and v2, giving you access to a range of features - from basic tweet posting to advanced streaming functionalities.
Head to your terminal, navigate to your project directory, and run the following command if you're using npm:
npm i twitter-api-v2
Prefer Yarn? Use this instead:
yarn add twitter-api-v2
The installation process is quick thanks to the library's minimal size.
"Light: No dependencies, 23kb minified+gzipped" - plhery, Library Maintainer
One of the library's most appealing aspects is its lack of dependencies, which helps keep your project lightweight and efficient.
Once installed, open your package.json file to confirm that twitter-api-v2 is listed under the dependencies section. The package also includes built-in TypeScript typings, so even if you're coding in plain JavaScript, you'll benefit from helpful autocomplete suggestions.
Next, test the installation by importing the library. For ES Modules, use this syntax:
import { TwitterApi } from 'twitter-api-v2';
If you're working with CommonJS, write:
const { TwitterApi } = require('twitter-api-v2');
Run your code, and if no "module not found" error pops up, the installation is good to go. Now you're ready to move on to configuring your API credentials to start making authenticated requests. For a broader overview of capabilities, check out this Twitter API guide.
Configuring API Credentials and Authentication
To connect your library to Twitter, you'll need to securely manage your API credentials using environment variables. Here's how to get started.
Storing API Keys Securely
To keep your API keys safe, store them in a .env file. This method ensures your credentials won't accidentally end up in public repositories. First, install the dotenv package to handle environment variables:
npm install dotenv
Next, create a .env file in your project's root directory and add your API credentials:
TWITTER_APP_KEY=your_api_key
TWITTER_APP_SECRET=your_api_secret
TWITTER_ACCESS_TOKEN=your_access_token
TWITTER_ACCESS_SECRET=your_access_secret
Remember to include .env in your .gitignore file so it won't be tracked by version control:
.env
With your keys securely stored, you're ready to configure authentication.
OAuth 1.0a and OAuth 2.0 Setup
The twitter-api-v2 library supports multiple authentication methods, including OAuth 1.0a and OAuth 2.0. Here's how to set up each one.
OAuth 1.0a is ideal for persistent tokens. Start by importing your environment variables and the library:
require('dotenv').config();
const { TwitterApi } = require('twitter-api-v2');
Then, initialize the client with your credentials:
const client = new TwitterApi({
  appKey: process.env.TWITTER_APP_KEY,
  appSecret: process.env.TWITTER_APP_SECRET,
  accessToken: process.env.TWITTER_ACCESS_TOKEN,
  accessSecret: process.env.TWITTER_ACCESS_SECRET,
});
Here, appKey and appSecret correspond to your Consumer Keys from the Twitter Developer Portal, while accessToken and accessSecret are your Authentication Tokens. Make sure to enable User authentication settings in the Developer Portal and set permissions to "Read and write."
For simpler, read-only access to public data, you can use OAuth 2.0 (App-only) with a Bearer Token:
const client = new TwitterApi(process.env.TWITTER_BEARER_TOKEN);
This method is perfect for tasks like searching tweets or viewing user profiles, though it doesn't allow content posting. For high-volume projects requiring Twitter data without authentication, enterprise-grade alternatives are also available. If you need more specific permissions (e.g., tweet.read or tweet.write), OAuth 2.0 User Context is available. However, keep in mind this option is limited to the v2 API and involves additional token management.
Once your client is set up, you can access v2 endpoints using the client.v2 property. This ensures all requests are automatically prefixed with the appropriate base URL.
sbb-itb-9cf686c
Writing Your First Tweet Function
Now that you've set up authentication, it's time to create a function that posts your first tweet. The twitter-api-v2 library simplifies this process with its .v2.tweet() method.
Asynchronous Tweet Function
To get started, define an asynchronous function using .v2.tweet(). This library works seamlessly with JavaScript's async/await syntax:
const rwClient = client.readWrite;

async function postTweet(text) {
  try {
    const tweet = await rwClient.v2.tweet(text);
    console.log(`Success! Tweet ID: ${tweet.data.id}`);
  } catch (error) {
    console.error('Error posting tweet:', error);
  }
}
The .readWrite property ensures you have the necessary permissions to post tweets. Wrapping the API call in a try/catch block helps handle issues like authentication errors or hitting Twitter's rate limits. If the tweet is successfully posted, Twitter's response will include the tweet's unique ID, accessible via tweet.data.id.
Note: Make sure your Twitter App is configured with "Read and write" permissions in the Developer Portal before proceeding.
Once the function is ready, it's time to test it.
Testing Tweet Functionality
To check if your function works, call it with a simple tweet:
postTweet('Hello from the twitter-api-v2 library!');
Run the script using node yourfilename.js in your terminal. If everything is set up correctly, you'll see the new tweet's ID logged in the console. Head over to your Twitter profile to confirm the tweet appears on your timeline.
If you encounter any errors, double-check that all required environment variables are correctly defined in your .env file. For rate limit errors (error code 429), you may need to pause briefly before retrying - waiting about 60 seconds is a common fix.
Posting Tweets with Media
Adding media to your tweets can make them more engaging and visually appealing. To include images or videos in your posts, you'll need to follow a two-step process: upload the media first, then reference it when composing your tweet. The twitter-api-v2 library simplifies this process, even managing chunked uploads for larger video files.
Uploading Media Files
The v1.uploadMedia() method allows you to upload media files and retrieve a media_id for use in your tweets. For local files, simply provide the file path:
async function uploadImage(filePath) {
  try {
    const mediaId = await rwClient.v1.uploadMedia(filePath);
    console.log(`Media uploaded! ID: ${mediaId}`);
    return mediaId;
  } catch (error) {
    console.error('Error uploading media:', error);
  }
}
The library automatically identifies the type of file you're uploading - whether it's an image, GIF, or video - and handles the appropriate upload process. Keep in mind Twitter's size limits: 5MB for images, 15MB for GIFs, and up to 512MB for videos.
If you're uploading a file from a Buffer, make sure to specify the MIME type using the EUploadMimeType enum (e.g., image/jpeg, image/png, video/mp4, image/gif). This helps avoid issues like 400 errors.
Once your media is uploaded and you have the media_id, you’re ready to include it in a tweet.
Combining Text and Media
With the media_id in hand, you can create a tweet that includes both text and media by structuring it as an object containing text and media fields:
async function postTweetWithMedia(text, mediaId) {
  try {
    const tweet = await rwClient.v2.tweet({
      text: text,
      media: { media_ids: [mediaId] }
    });
    console.log(`Tweet with media posted! ID: ${tweet.data.id}`);
  } catch (error) {
    console.error('Error posting tweet with media:', error);
  }
}

// Upload and tweet in sequence
const mediaId = await uploadImage('./photo.png');
await postTweetWithMedia('Check out this image!', mediaId);
Make sure your Twitter App has "Write" permissions enabled; otherwise, you'll encounter a 403 error when trying to post tweets that include media. For video uploads, check the upload response for a "pending" processing status. If the media is still processing, you may need to wait before the media_id is ready to use in a tweet.
Testing and Troubleshooting
Analyzing Console Logs
Console logs are a great way to confirm the success of your API calls. For instance, when you post a tweet, a successful response will include tweet.data.id. To double-check authentication, you can use .v1.verifyCredentials() or .currentUser() for v1.1 endpoints, and .v2.me() or .currentUserV2() for v2 endpoints. If everything is working properly, you'll get a user object back. If not, the call will throw an ApiResponseError, with detailed information in the error.data field.
The library also provides typed errors that help pinpoint the cause of failures. Properties like error.code, error.data.title, and error.data.detail offer specific insights into what went wrong. Additionally, headers like x-rate-limit-remaining and x-rate-limit-reset can help you manage rate limits effectively. By reviewing these details, you can troubleshoot issues with greater precision.
Debugging Common Errors
When errors arise, identifying the root cause quickly can save time. Below is a quick reference for common error codes and their fixes:
| Error Code | Message | Cause | Recommended Fix |
|---|---|---|---|
| 401 | Unauthorized | Invalid or missing API keys/tokens | Re-generate tokens and double-check for typos in your .env file |
| 403 | Forbidden / Client-not-enrolled | App not linked to a Project or insufficient API tier | Attach your App to a Project in the Developer Portal or upgrade to the Basic plan (upgrade to the Basic plan ($100/month)00/month) or explore affordable X API alternatives |
| 403 | Unsupported Authentication | Using a Bearer Token for POST requests | Use OAuth 1.0a for tweet creation and other write actions |
| 429 | Rate Limit Exceeded | Too many requests in a short time | Implement backoff logic and wait until the x-rate-limit-reset time |
For a 401 Unauthorized error, ensure that all your environment variables are correctly set up. The required parameters include appKey (API Key), appSecret (API Key Secret), accessToken (Access Token), and accessSecret (Access Token Secret).
If you encounter a 403 Forbidden error, log into the Twitter Developer Portal and check that your App is attached to a "Project" rather than listed as a "Standalone App." Also, confirm that the App has "Read and Write" permissions. If you make changes to these settings, you'll need to regenerate your access tokens. Keep in mind that for Twitter API v2, the keys and tokens must come from an App that’s part of a Project.
For media upload issues, verify that your credentials have write permissions and that you've explicitly specified the mimeType during the upload process. Before diving into complex operations, test your credentials with a simple "Me" request to ensure they are functioning correctly.
Wrapping It Up
You've successfully set up the twitter-api-v2 library, covering everything from managing API credentials to posting tweets with media. This library is a solid option for working with the Twitter API, as it supports both v1.1 and v2 endpoints. Its lightweight, zero-dependency design not only minimizes security concerns but also keeps your project efficient and straightforward.
With built-in TypeScript definitions and compatibility with OAuth 1.0a and OAuth 2.0, this library simplifies error handling during development and offers the flexibility to integrate both older and newer Twitter API resources and tools. By following these steps, you’re now equipped to handle Twitter integrations with ease.
FAQs
Which Twitter auth method should I use for read vs write actions?
The recommended Twitter authentication method varies based on the type of action you're performing:
- OAuth 2.0 Bearer Token: Best for read-only actions, like accessing public data. This method does not need user authentication.
- OAuth 1.0a: Ideal for write actions, such as posting tweets or performing interactions on behalf of a user. This approach requires user consent and enables account-specific tasks.
How do I estimate monthly Twitter API costs for my app?
To calculate your monthly Twitter API expenses, consider the pay-as-you-go pricing model from TwitterAPI.io. Here's how it works:
- Tweets: $0.15 per 1,000 tweets
- Profiles: $0.18 per 1,000 profiles
There are no monthly commitments, so you only pay for what you use. For instance, if you need to analyze 100,000 tweets, it would cost approximately $15. This setup allows you to adjust your spending based on your actual needs, making it a flexible option compared to rigid subscription plans.
What’s the best way to handle rate limits and retries in Node.js?
To handle rate limits and retries effectively in Node.js when working with the Twitter API, it’s crucial to keep an eye on rate limit headers, implement smart backoff strategies, and leverage helpful tools like @twitter-api-v2/plugin-rate-limit. This plugin helps by storing and checking rate limit data, ensuring you don’t accidentally exceed the API's limits.
Twitter also provides some best practices to streamline your API usage:
- Monitor rate limit headers: These headers indicate your remaining requests and when the limit resets.
- Use exponential backoff: Gradually increase retry intervals after failed requests to avoid overwhelming the API.
- Cache responses: Reduce unnecessary API calls by storing and reusing data when possible.
- Utilize bulk endpoints: These endpoints allow you to fetch more data in fewer requests, making your usage more efficient.
By combining these strategies, you can interact with the Twitter API reliably while staying within its usage guidelines.
Tags
Related articles
Ready to get started?
Try TwitterAPI.io for free and access powerful Twitter data APIs.
Get Started Free